Electric Scooter Brakes: A Beginner’s Guide
From hydraulic discs to electromagnetic braking systems, there’s a variety of brakes to choose from, and making sure you understand which is best for you is key to your safety.

Throughout this guide, we’ll cover the different types of brakes, factors that affect stopping power, and walk you through the steps you need to take to maintain, replace, and upgrade your brakes.
Mechanical
Foot Brake
How Do Foot Brakes Work?
Foot brakes are found on cheap and slow electric scooters since the braking power needed is minimal.
Unlike other more complex braking systems, their design is simple in construction and relies on one component. The only component used is a plastic fender positioned above the rear wheel. To operate the brake, you stomp down on it with your foot. This pushes it against the moving tire, creates friction, and slows the scooter.
Not all fenders can be used as foot brakes, though. They must be purposefully designed to be strong, flexible, and withstand friction. In most cases, the fenders are hinged and springloaded so that they can be moved into position. If you were to try to brake using a fender that wasn’t built for braking, it would likely incur damage.
However, with its simplicity comes a major drawback. When applying pressure to the fender, it not only causes it to rub against the tire and lead to permanent damage, but if you stomp on the brake too hard, the rear wheel can lock and cause you to skid while braking. This is why they’re found on cheaper, slower scooters.
Pros
- Simple to operate
- Cheap to make and install
Cons
- Only suitable for slow scooters
- Can damage the tire
- Can cause the rear wheel to lock and skid
- Weakest braking mechanism
How to Adjust?
Most foot brakes are single-unit pieces that can’t be adjusted.
If you have a foot brake that isn’t working correctly, the most common course of action is to have it replaced.
Drum

How Do Drum Brakes Work?
A drum brake is completely enclosed in a circular drum-like shell. It’s then mounted inside a scooter’s wheel hub.
Thanks to their low maintenance design and reliable stopping power, drum brakes are found on both budget and commuter electric scooters.
However, because drum brakes can’t generate as much braking force as disc brake systems, higher-performing scooters (i.e. those that can reach speeds of 30 mph and beyond), tend to opt for the latter.
How drum brakes slow a scooter depends on several components. In brief, the brake is activated when you pull the brake lever. The cable that’s attached to the lever and drum then applies pressure to the piston. The piston pushes the stationary brake shoe into contact with the rotating drum lining. The friction between these two surfaces slows the wheel and stops the scooter from moving forward.
To better understand how drum brakes work, we’ve explained what each component does below:
Brake lever – A standard brake lever is mounted on the handlebars and is used to activate the drum brake when pulled. The performance of the brake depends on how hard you pull the lever. Pulling it hard will slow you faster and pulling it gently will slow you more gradually. Most brake levers are similar, even if the type of brake is different.
Brake cable – A brake cable runs from the lever to the drum brake. When the brake lever is pulled it puts tension on the cable. This tension then applies pressure to the piston.
Pistons (Wheel Cylinder) – Inside the drum brake is a small piston connected to the brake cable and the internal brake shoe. The piston has two positions; retracted and extended. When the piston is retracted the brake shoe is held away from the brake lining and the wheel can rotate freely.
Brake Shoe (Pads) & Lining – The brake shoe is the central section of the drum brake that remains stationary as the wheel rotates. When the piston is extended it pushes the brake shoe against the drum lining. This is the point at which the brakes are fully engaged and the process of slowing the scooter begins.
Drum – The drum is the outer shell of the brake. It’s attached to the wheel and rotates as the wheel moves. Inside the drum is the brake lining that creates friction when the brake shoe is applied.
Pros
- Long-lasting and low maintenance
- Reliable in wet weather
- Durable thanks to the encased design (they won't fade or warp as a result of external riding conditions)
- They can last longer than other brake types because the contact area is larger
Cons
- Hard to replace internal parts so the whole unit will need to be replaced
- Not as strong as disc brakes
How to Adjust?
Drum brakes are unlikely to need adjusting during their lifetime. However, in most cases, you can adjust them yourself. Here, it’s a simple case of pinching either side of the brake hose together to take the pressure off the drum and twisting the screw either counter-clockwise to weaken the brake or clockwise to strengthen it.
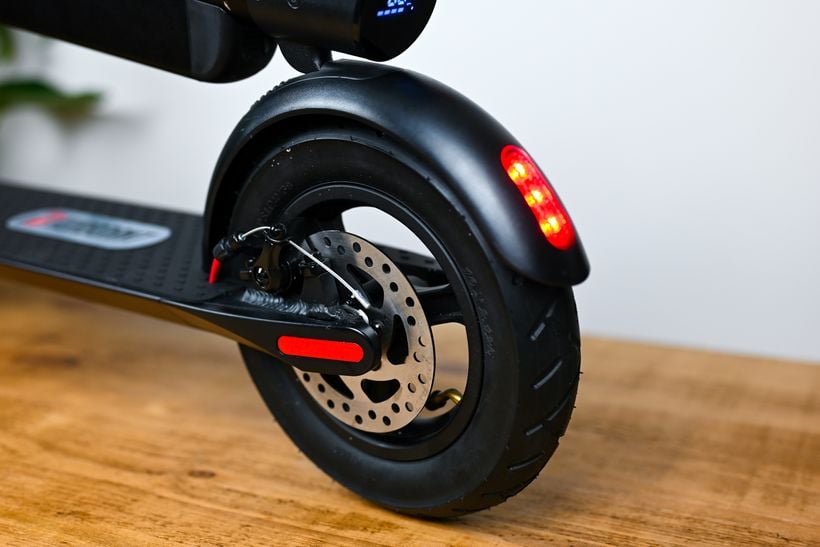
Cable-Actuated Disc

How Do Cable-Actuated Disc Brakes Work?
Cable-actuated disc brakes are found on budget, commuter, and performance scooters.
Unlike drum brakes, all of the components that make up disc brakes are externally attached to the scooter, making them easier to maintain. They operate with a simple mechanical action and rely on the coordinated movement of several parts.
When you pull the brake lever, it puts pressure on the brake cable. This pulls on the caliper causing it to push the brake pads into contact with the disc. The friction between the brake pad and the rotor slows the movement of the wheel and brings the scooter to a stop.
To better understand how disc brakes work, we’ve explained what each component does below:
Brake lever – As with most hand-activated brake systems, cable-actuated disc brakes are operated by a brake lever mounted on the scooter’s handlebars. When you squeeze your grip around the lever it pulls the brake cable.
Brake cable – The brake cable is made up of a hollow plastic tube that contains a narrow steel wire. It runs from the brake lever to the calipers.
Calipers – Calipers are the units that are responsible for applying braking force to the discs. They contain opposed pistons that sit on either side of the rotor. Pressure from the brake cable engages these pistons to push the brake pads inward to contact the disc.
Brake pads – This is the part of the brake that is pushed against the disc to create friction and slow the scooter. Brake pads can wear down and become damaged so they need to be replaced every few years.
Brake Rotor (Disc) – The brake rotor is a circular metal disc attached to the wheel. It rotates as the wheel spins, then as the brake pads are applied, the rotation of the rotor slows, reducing the scooter’s speed.
Typically, electric scooter discs come in three sizes: 120mm, 140mm, and 160mm. They also come in a variety of designs, and although this may be mistaken for a vanity measure, the geometrically inspired cutouts help to dissipate heat and keep the brakes working as efficiently as possible.
Pros
- Strong stopping power
- Consistent braking
- Easy to clean and maintain
Cons
- They can fade and warp as a result of external ridings conditions
- Heat and friction may result in the need for regular maintenance, adjustments, or replacement
- You need to pull on the levers hard to produce maximum braking force
How to Adjust?
Each part of a cable-actuated disc brake system is easy to access, replace and adjust.
Most systems can be adjusted by loosening or tightening the bolts holding the calipers in place. Here, you can achieve a better alignment of the calipers and brake pads to ensure improved braking performance.
You can also replace the brake pads, meaning you can keep maintenance costs low instead of having to fork out for an entirely new braking setup.
Semi-Hydraulic Disc

How Do Semi-Hydraulic Disc Brakes Work?
Semi-hydraulic disc brakes consist of a standard mechanical brake cable connected to calipers loaded with hydraulic pistons. While most of the parts are similar to those in cable-actuated disc brakes, there are a few differences.
When the brake lever is pulled, the wire inside the brake cable pulls on the calipers. This applies pressure to the hydraulic pistons, filling them with hydraulic fluid and driving the brake pads against the rotor. No matter how hard you pull the brake lever, the activation of the pistons applies strong pressure. This means that semi-hydraulic discs are easier to activate and always provide excellent stopping power.
To better understand how semi-hydraulic discs work, we’ve explained what each component does below:
Brake lever – Semi-hydraulic brakes have standard brake levers that are located on the handlebars. A simple pulling action activates the brakes.
Brake cable – Identical to those used on cable-actuated disc brakes, this is a hollow cable with a narrow steel wire inside. When the hand lever is pulled, the wire pulls the calipers.
Hydraulic piston – Unlike standard cable-actuated brakes, these have calipers with built-in hydraulic pistons. When the brake cables are pulled, the pistons activate, pushing the brake pads into contact with the rotors.
Brake Rotor (Disc) – This metal disc is fixed to the center of the wheel. When the brakes are activated the brake pads squeeze the discs. Because of the pressure that the semi-hydraulic pistons apply, all electric scooters with these have discs that measure 140mm and feature designs that aid the dissipation of heat.
Pros
- Hydraulic pistons put strong immediate pressure on the discs
- Reliable braking power
- Easier to install and maintain than full-hydraulics
Cons
- More expensive than cable-actuated systems
- More lever pull is needed to produce the same braking force as a fully hydraulic brake system
How to Adjust?
You can adjust semi-hydraulic brakes by loosening the two bolts that hold the calipers in place. Then adjust the position of the calipers and retighten the bolts. This will allow you to better align the calipers, brake pads, and discs for better braking performance.
However, if the brake calipers are hard to access, it’s best to refer to your user manual or contact a professional to make any adjustments.
Fully-Hydraulic Disc

How Do Full-Hydraulic Disc Brakes Work?
Hydraulic disc brakes consist of a fully hydraulic system that stretches from the brake levers to the pistons in the calipers. Like semi-hydraulic brakes, the hydraulic pistons within the calipers remain, but the steel brake cable is replaced by a brake line that’s filled with hydraulic fluid.
When you pull the brake lever, brake fluid is forced out of a small cylinder by a plunger. This fluid is then forced into the brake line. When the fluid in the brake line is placed under pressure, it forces the hydraulic pistons in the calipers to squeeze the brake pads against the discs. This creates friction and causes the scooter to slow down.
To better understand how full-hydraulic discs work, we’ve explained what each component does below:
Brake lever – The lever for hydraulic brakes looks the same as those for other brake systems but has different internal components. Inside there’s a reservoir of brake fluid and a connection to the brake line.
Brake line – Full-hydraulic brakes don’t have a brake cable, instead, they have a hollow brake line that’s full of hydraulic fluid. This runs from the brake lever to the calipers.
Calipers – Like semi-hydraulic brakes, the calipers have hydraulic pistons. It’s the piston’s job to push the brake pads against the disc.
Disc (Rotor) – The discs in a full-hydraulic system provide the same function as with any other disc brake and look the same as those found in semi-hydraulic systems. The only differences may be that they are slightly thicker (from 2mm to 3mm), and have bigger diameters (from 140mm to 160mm) to better manage the extremely strong braking forces exerted on them.
Pros
- Strongest level of braking power
- Only a small amount of lever pull is needed to produce a strong braking force
- Little need for adjustment
- There are no cables to get stuck or damaged
Cons
- Most expensive braking system
- They can be complex to service and repair
How to Adjust?
Hydraulic brakes are generally self-adjusting and any maintenance is best carried out by a professional.
However, you may be able to adjust the position of the calipers to better control how the brake pads squeeze the rotors.
The most common cause of adjustment is needed when air bubbles make their way into the hydraulic fluid, thereby relieving pressure and making the brakes feel spongey. In these circumstances, you can buy hydraulic brake refill kits. These come with all the necessary parts you need – including a syringe – so you can inject the fluid into the brake reservoir and force any air bubbles out.
Electronic
Electromagnetic

How Do Electromagnetic Brakes Work?
From budget models to high-performing scooters, electromagnetic brakes are found in the vast majority of electric scooters. Typically, this type of braking system is built into the brake lever. Whenever you pull on the lever, a sensor will detect that you are braking and engage the electronic brake.
When engaged, it sends an electric current through an electromagnet to create a magnetic field. This field exerts a magnetic pull on the spinning central spindle to slow the rotation of the wheel.
It’s important to not get these types of brakes mixed up with regenerative systems. Although they work in a similar way, electromagnetic brakes don’t recycle wasted energy.
To better understand how electromagnetic brakes work, we’ve explained what each component does below:
Brake lever or button – Unlike other brakes, electromagnetic brakes are either built into the braking lever of a mechanical brake or are engaged via a dedicated button. When the brake lever is pulled or the button is pressed, the electromagnetic brake works simultaneously alongside the mechanical brake to bolster stopping power.
Electromagnet – Electromagnets are different from standard magnets. Instead, they consist of a wire wound into a coil around a magnetic core. Electrical currents then pass through the wire and the core concentrates the magnetic flux to make a powerful magnet.
So long as the lever or button for the electronic brake is engaged, a continuous supply of current maintains the magnetic field and slows the scooter.
Pros
- No maintenance
- Bolsters the stopping power of mechanical brakes
- Seamless integration means one less thing to think about when braking
Cons
- Not strong enough to be used on their own
How to Adjust?
The ability to adjust the strength of electronic brakes depends on your scooter.
Most budget models will come with a preset strength that you can’t change, while other more expensive models give you the option to select the intensity level from 1 to 5 (with 1 being the weakest and 5 the strongest).
Regenerative

How Do Regenerative Brakes Work?
Similar to electromagnetic brakes, regenerative ones use the scooter’s motor to slow it down. However, they recycle otherwise wasted energy back into the battery when braking.
When the regenerative brake is engaged, a device known as a controller – which regulates the operation of the electric motor – stops the flow of electricity from the battery to the motor. Because the scooter is still moving forward while braking, kinetic energy is created which keeps the motor turning. This creates electricity which is directed to the battery for storage. By drawing the kinetic energy from the motor in the form of electricity, drag is created, slowing and eventually stopping the scooter.
To better understand how regenerative brakes work, we’ve explained what each component does below:
Brake Paddle or Lever – Regenerative brakes are either controlled by a dedicated paddle, similar to a thumb throttle, or they’re combined with another braking system and are activated when the rider pulls the brake lever.
Battery Charging System – When regenerative brakes are switched on, the flow of electricity is reversed. Instead of going from the battery to the motor, the electromagnet in the motor is connected to the battery charging system. It’s used to convert the motor’s kinetic energy into electricity so that it can be stored in the battery.
Pros
- No maintenance
- Bolsters the stopping power of mechanical brakes
- Recovered energy is recycled
Cons
- Not strong enough to be used on its own
- There needs to be space available in the battery for it to be effective
How to Adjust?
Some electric scooters come with displays that let you access the scooter’s P-settings. These settings can be used to customize the intensity of the regenerative brakes across 5 levels with 1 being the weakest and 5 the strongest.
Anti-Lock Braking System (ABS)

How Does an Anti-Lock Braking System Work?
Anti-lock braking systems are designed to prevent wheel lock so that you can remain safe and in control at all times.
They work by sensing when the wheels are about to lock and then rapidly reducing and increasing the braking pressure multiple times per second, applying optimal pressure. This allows the wheels to keep moving as the scooter slows down, instead of locking up.
To better understand how ABS brakes work, we’ve explained what each component does below:
Sensors – Speed sensors on both wheels detect when the brakes lock and immediately signal this to the controllers.
Controllers – Controllers are electronic circuits that monitor and regulate the delivery of power throughout the scooter. Once the controller receives the signal from the sensors that the wheels have locked, it limits the brake force and activates the ABS to actuate the braking motion.
Pros
- Prevents skidding
- Safer braking, especially during emergency stops and at speed
- Improved traction control
Cons
- You can feel the vibrations caused by the ABS when it rapidly modulates braking pressure
How to Adjust?
There’s no way to adjust the intensity of an anti-lock braking system. However, most scooters that have one allow you to turn it either on or off.
In short, mechanical brakes – including drums, cable-actuated discs, semi-hydraulic discs, and full-hydraulic discs – are significantly better than electronic brakes. This all comes down to the fact that mechanical brakes offer greater stopping power.
Most electric scooters come with both a mechanical and electronic brake. This is because electronic brakes are an excellent way to add extra stopping power without increasing the weight of the scooter.
You’ll rarely find a scooter with an electronic brake alone. In cases like this, we recommend avoiding the scooter. This is because they can’t produce enough power to bring you to a safe stop within a reasonable distance. Also, if your scooter suffers an electrical fault that cuts the power, you can rely on the mechanical brakes to modulate your speed, whereas electronic brakes will be useless.

Front Only

If your scooter has one brake on the front wheel, it will provide stronger stopping power than if it was at the rear. This is because it’s positioned in front of your center of mass creating more friction to slow the scooter. This means that you'll stop quickly, but if you brake too hard, a front brake could also cause the scooter to tip forward, lifting the rear wheel off the ground.
Rear Only

A single rear brake is ideal if you want steady gradual braking but it might not produce enough stopping power for short emergency stops. However, with a rear brake, there’s no risk of being thrown over the handlebars. There is a risk of skidding when the brake is pulled too hard, though.
Front & Rear

A combination of a brake on both wheels is by far the safest and most effective braking setup for electric scooters. This spreads the braking power resulting in shorter stopping distances, greater control, and reduced risk of skidding.
Ultimately, the most effective setup is dual mechanical brakes, with full hydraulic discs delivering the strongest and most efficient braking.
Rotor (Disc) Size

The larger the rotor, the greater the leverage that can be applied to stop the wheel from turning. The same can be said for the thickness of a rotor. As a result, bigger rotors make for better braking performance.
Budget and commuter scooters with disc brakes often have rotors that measure between 120mm and 140mm in diameter and 2mm in depth. On the other hand, faster-performance scooters have rotors that measure between 140mm and 160mm with a depth of either 2mm or 3mm.
Rotor (Disc) Design

Most rotors are designed with lots of holes and cut-outs. This reduces their weight, but more importantly, allows water and dirt to escape.
Adding a large solid plate of metal would adversely affect the caliper’s ability to apply pressure and therefore, slow the braking process. Also, a solid disc would simply trap water and dirt between its surface and the brake pads.
So, not only do the holes and cutouts ensure better braking performance, but their sharp edges score the surface of the brake pads to prevent glazing (i.e. when the pad surface gets highly polished by the disc and leads to poor braking).
Kill Switch

A kill switch is an essential safety device on electric scooters but it also plays a role in ensuring your stopping distance is as short as possible.
When you pull on the brake/s, the kill switch is automatically tripped to disconnect the motor from the battery. This prevents the motor and brake from being active simultaneously and fighting against each other. Using both at the same time would waste energy and significantly extend your stopping distance.
Speed

The faster a scooter is traveling, the longer the stopping distance will be.
For example, a performance scooter capable of reaching 40 mph, will have a much longer stopping distance than a 20 mph commuter scooter, no matter how effective the brakes are.
We record the stopping distances of all the electric scooters that we test from 15 mph to ensure there’s consistency when it comes to choosing the best electric scooter.
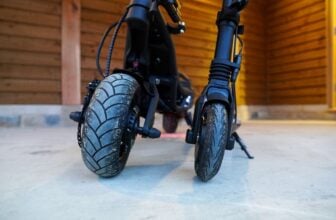
Tires (Size, Type & Tread)

Tires with a larger diameter and thicker width maintain more traction since they have a bigger contact patch with the ground.
Similarly, the type of tire plays a significant role in how effective the brakes are. The greater the surface area of the tire that can come into contact with the ground, the quicker it will come to a stop. The best tire profile for braking is those that are pneumatic (air-filled). Scooters with solid tires, on the other hand, are prone to skidding since the hard rubber can’t mold to the ground.
The final aspect of tire design that impacts braking performance is the tread. Some tires are smooth while others feature deep grippy tread patterns. Ultimately, the more texturized the tread, the greater the tire's ability to maintain traction.
Suspension

Firm, well-maintained suspension allows scooter brakes to perform as they should, but loose, worn shocks can reduce their effectiveness.
If your scooter’s suspension is not working as it should, it will affect how the tires make contact with the road and can even disturb the distribution of weight by wobbling back and forward.
Terrain

Effective braking depends on the wheel having good contact with the ground. Anything that interferes with this, such as dirt, gravel, mud, or rain can cause skidding and longer stopping distances.
While you’re most likely to get shorter stopping distances on flat, well-maintained surfaces, it's not always possible to keep your scooter in these areas. If you need to travel on rougher surfaces, make sure your scooter is suitable for that terrain type and has the correct tires fitted (i.e. specialist off-road tires).
Weather

Rain, snow, and ice can get in between your tires and the road, interfering with traction and extending the distance it takes to come to a complete stop.
Ensuring you have the correct tires with a deep enough tread will help keep you in control. But you should also consider choosing an electric scooter with an anti-lock braking system to safely modulate your braking power.
Weight

The heavier the scooter and the rider, the higher the momentum, and the longer the stopping distance.
If you’re a heavier rider, it’s best to opt for a scooter that has sufficient brakes – especially if you plan on riding over 20 mph. Under these circumstances, we recommend a minimum of dual cable-actuated disc brakes.
Rider Posture
If you lean forward or backward while riding it alters the center of gravity of the scooter.
Making sure you’re prepared for when you brake by shifting your weight over the back of the scooter can significantly improve stopping distance.
Reposition Brake Pads

With mechanical disc brakes, you may hear the sound of the disc rubbing against the brake pads or experience poor stopping power if the pads aren’t aligned properly to the rotor.
The first step to take is to check the state of the pads. If they’re worn down, they will need replacing, but if they aren’t, you can proceed with repositioning them.
Cable-actuated calipers usually have bolts or adjustment dials on either side. These can be loosened and tightened to move the pads away from or closer to the rotor. Semi-hydraulic and hydraulic brakes are self-adjusting and shouldn’t need repositioning.
Bleeding Hydraulic Brakes

If your hydraulic brakes start to feel spongy when you pull the lever or don’t activate until you’ve pulled it all the way to the handlebars, they likely need bleeding.
This is usually caused by air getting into the hydraulic fluid. Bleeding is the process that removes the air bubbles or replaces the fluid. Depending on the type of brakes, you may need a specific kit or need to follow a certain procedure. Typically, though, the kit will include a syringe that you use to inject hydraulic fluid into the brake reservoir to force air bubbles out.
Fix Warped Discs

Warped discs can be caused by impacts, poor-quality materials, uneven wear, or even overheating.
To see if your discs are warped, start by lifting your scooter onto a box so the wheel can spin freely. Stand over the wheel, look directly down at it, and then spin it. If the disc spins in a wavy motion it’s warped and needs fixing.
Before you can fix it you’ll need to identify where it’s bent. To do this, take a marker pen and hold it against the rotor so it’s just touching. Brace your hand and spin the wheel. Any areas where the pen has not marked the rotor are the spots that need adjusting.
Get a small crescent wrench and tighten it in the center of the area that needs adjusting. Using the wrench bend the rotor back into a straight position. Spin the rotor again to check for wobble, if it’s spinning smoothly, you’ve fixed it successfully. If you can still see movement, repeat the process, until it’s fixed.
Is it Possible to Upgrade or Replace Your Brakes?

Most mechanical brakes such as those with discs can be upgraded or replaced. This is because these are attached externally. However, it’s essential that you only replace them with a brake type that’s appropriate for your scooter. Drum brakes, electronic-magnetic brakes, and regenerative brakes are built into the scooters and are much harder to replace.
Recommended Brake Brands

The vast majority of drum and cable-actuated disc brakes use standardized components, so the brand they come from doesn’t matter too much.
However, where you should pay attention is when it comes to hydraulic braking setups. Here, the best electric scooter brake brands include Zoom, Nutt, Magura, and Logan. These are all well-respected brands with a history of producing reliable brake systems with short stopping distances.